
France is one of my favorite places on earth. There’s something extremely appealing about the carefree lifestyle, beautiful language, and amazing food. Other than museums, I spend a majority of my time browsing food markets and pastry shops. The best food market ever is Les Halles de Lyon in Lyon, France. It’s an indoor market established in 1859 and has 48 vendors ranging from butchers to bakeries to fishmongers to chocolate to cheese.
I used the market as a shortcut to get from the train station to the hotel but would dawdle for at least two hours at the market! There was also always something new to discover every time. Towards the end, I had bought baked goods from every pastry shop at the market. My favorite thing to order was the canelé!

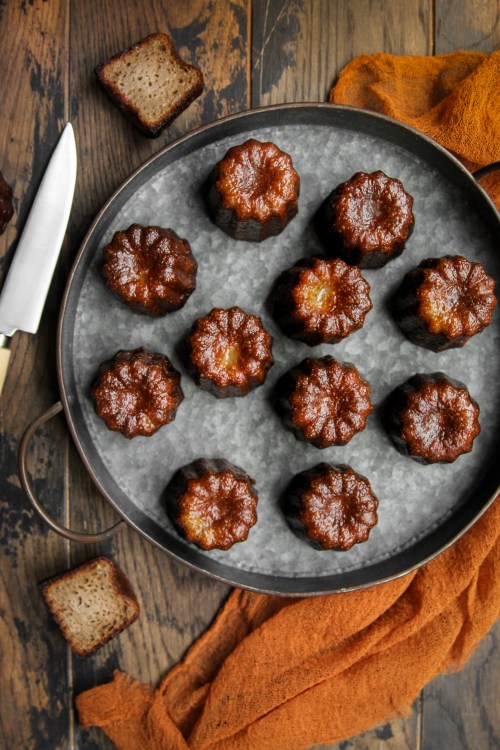
What is a Canelé
Originally known as cannelé Bordelaise, as they originate from Bordeaux, is a small French baked pastry. The exterior is crispy with a rich caramelized crust and the interior is custardy and soft. Canelés are widely available in patisseries all over the world today. They’re not super well known because they’re so labor intensive but they’re slowly becoming popular again.
Most history books agree that the canelé was created between the 15th and 18th century at convents around the winemaking regions of Bordeaux. Winemakers used egg whites to clarify their wine in a process called egg white fining. The egg yolks were of no use and were donated to the nuns to make food for the poor. The nuns got creative and made a canelé!

Tools of the Trade
The word canelé comes from the French word “fluted” to describe the shape. These fluted molds are very expensive. There are some silicone versions but there’s no way to create a classic canelé with those. Canelé exteriors must be a crispy crust and metal molds is the only way to achieve this crust. Individual copper molds are traditional but can cost up to $50 for a set of four. But there’s nothing else that bakes into this fluted shape. I’ve tried using a muffin tin in the past and it’s odd eating something without the ridges.
I don’t make canelés enough to justify purchasing copper molds so I did some research. I found a carbon steel canelé muffin tin under $30. It works great for home bakers! I end up only baking in the molds along the edges (leaving the two in the center empty) to allow for the heat to really build up and get that signature crust. I use this same trick when making muffin tin popovers!
The Recipe: Tips and Tricks
I will be very honest, this recipe is not easy. The batter requires a long resting time (up to four days). And the baking process is time consuming and labor intensive. But in the end, these baked custardy morsels are worth the time if you love good pastry. I originally used the Bon Appétit recipe but they kept failing after several test runs. I decided to increase the ratio of eggs and adjusted the oven temperature/times and came up with my own recipe in the end.
- Batter Rest Time: this is such a hot debate between patisseries. Each one has their own ideal resting time. Resting allows the flour to hydrate and any built up gluten in the batter to relax so you have soft canelés instead of chewy. The longer it sits, the richer the flavor will also develop. I’ve experimented with different rest times and I highly recommend four days but at least 24 hours if you can’t wait.
- Coating: traditionally, canelé molds are coated with beeswax to help develop that gorgeous crust and shine. I don’t always love beeswax on canelés. When made by an extremely skilled baker, the beeswax coating is so thin that it’s negligible. But I’ve had some that were coated super thick and I’m not a fan of beeswax stuck in my teeth (especially not when I’m trying to look cute strolling the quaint rues de francais). For these that I make at home, I coat the molds with melted butter. I only want to be able to get them out of the molds. I offset this with a bit of a higher initial baking temperate to get that crust. Without the beeswax, their shapes can get wonky after a few days so make plans to eat them all soon after baking!
- Oven Heat: you’ll want the initial to be as hot as your oven can go. For me, that’s 550F. The idea is to get a good crust on the outside of the pastry (where the batter touches the mold) for a short period of time to avoid burning. Then you’ll have to lower the temperature immediately to 325F. In order to avoid the aforementioned burning, I open my oven door to allow for rapid cooling to get the temperature down. Sometimes, oven temperatures are not what the dial says they are. I would highly recommend investing in an instant read oven thermometer. My first batch burnt because I didn’t have one.
- Flavors: I feel like the world is your oyster here. Classic canelé have flavors of vanilla and rum. For my version, I steeped hojicha in the milk for that extra roasted aroma. But you don’t need to stop there! I’ve seen versions with match and ube. Send me a ping if you come up with a delicious flavor!
Happy baking!

Hojicha Canelé
Ingredients
- 2 1/4 cups whole milk
- 1 cup hojicha tea leaves
- 3 tablespoons unsalted butter
- 1 cup granulated sugar
- 3/4 cup all purpose flour
- 2 eggs and 3 additional yolks, room temperature
- 1 teaspoon salt
- 1/2 cup rum
Directions
- Step 1 In a medium sized pot, heat milk until it just begins to boil. Add hojicha and allow to steep for 15 minutes.
- Step 2 Sieve hojicha milk mixture into a measuring cup to measure 2 cups (you may discard the rest) and add butter to melt.
- Step 3 In medium bowl, beat eggs and egg yolks. Slowly pour in milk to temper the eggs and whisk to combine.
- Step 4 In another medium bowl, whisk together flour, sugar, and salt. Pour in milk egg mixture and whisk well.
- Step 5 Add rum at the end.
- Step 6 Place batter into the refrigerate and allow to rest for at least 24 hours (four days is ideal).
- Step 7 Preheat oven to 550F and place empty canelé molds/muffin tin to heat up.
- Step 8 Carefully take mold out and pour 1/4 cup of batter into the molds. Bake for 10 minutes.
- Step 9 Immediately lower temperature to 325F and bake for 50 minutes.
- Step 10 Remove the canelés from the mold immediately and allow to cool completely before eating.


You must be logged in to post a comment.